Learning basic thermostat wiring helps you take control of your HVAC system and can save you a service call for a simple upgrade. Many homeowners find that they can learn how to replace a thermostat with some basic tools and a bit of patience.
How Do I Prepare for New Thermostat Wiring?
Safety is the priority when working with any electrical component in your home. First, turn off the power at the circuit breaker to prevent accidental shorts that could damage your HVAC control board. Be sure to snap a photo of your old setup before removing any thermostat wire so you have a reliable backup reference. Using masking tape to label each wire according to the letter on the terminal helps you stay organized.
Once labeled, make sure the wires don’t slip back into the wall opening by wrapping them around a pencil or using a small piece of painter’s tape to hold them in place. It’s a simple trick that can save you the frustration of fishing wires out from behind the drywall later.
Where Can I Find a Thermostat Wiring Diagram?
Most new devices come with a thermostat wiring diagram in the installation manual that translates the color-coded cables into system functions. Red wires typically carry power. Green wires handle the fan, and yellow wires manage the cooling. Matching these to the corresponding letters on your new wall plate is the core of the job.
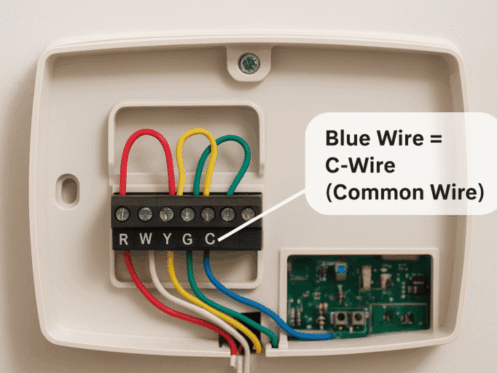
What Is a C Wire on a Thermostat?
The “C” stands for common, and it completes the 24V circuit that powers the device’s advanced features. Modern smart thermostats often require a continuous power source to keep their Wi-Fi and backlit screens active. If your old wall plate lacks a blue wire or a wire labeled “C,” you may need an adapter or a professional installation to bridge the gap. Don’t have a smart thermostat yet? Get one installed today.
How to Wire a Thermostat in 4 Steps
Wiring a thermostat requires a gentle touch and precise placement:
- Insert each labeled wire into the corresponding terminal on the new wall plate.
- Tighten the small terminal screws or press the release tabs to lock the wires in place.
- Mount the thermostat faceplate onto the wall bracket until it clicks firmly.
- Restore power at the breaker and follow the on-screen prompts for initial setup.
Following these steps allows the system to boot up and begin regulating your St. Louis home’s climate.
How to Work a Thermostat
Once your thermostat is installed, you work the device by selecting your preferred mode—heating, cooling, auto or schedule—and using the interface to set the temperature to your desired comfort level. Programming a recurring schedule through the settings menu allows the system to adjust itself automatically throughout the day to maximize energy efficiency and comfort.
Wiring a thermostat is tough, especially if you’re going it alone. If the thermostat wiring feels overly complex or you still don’t know how to work a thermostat after a DIY attempt, professional assistance is just a call away.
Reach out to our Fenton office whenever you need a hand from thermostat experts in St. Louis.
