
 St. Louis, MO &
  View Discounts
If you’ve been wondering how to clean an outdoor AC unit, it’s easier than you might think. Leaves, pollen, dirt, grass clippings and other debris can accumulate around the unit and get stuck to the condenser coils. This restricts airflow and forces your air conditioner to work harder to cool your home.
Routine cleaning boosts efficiency, improves airflow and makes it easier to spot minor damage before it turns into a major repair bill. In many cases, all you need is a garden hose, an AC condenser coil cleaner and a soft brush. Here’s how you can clean your unit in five easy steps.
1. Turn Off the Power
Before cleaning an outside AC unit, shut off power to the cooling system using your home’s circuit breaker or the unit’s disconnect switch. The unit’s high-voltage electrical components and fan blades can cause serious injuries, and turning off the thermostat isn’t enough. If you can’t find the switch or the correct breaker, stop what you’re doing and contact Anton’s for help. It’s not safe to work around an AC condenser while it has power.
Once you turn off the power, give the system time to cool down. It’s also important to choose a mild, dry day. You shouldn’t clean an air conditioner if it’s thundering or pouring rain, and you probably don’t want to do it while you’re shivering or sweating. Protect yourself by wearing thick gloves and safety glasses while you work.
2. Clear Debris From Around the Unit
Before you learn how to clean AC coils outside, it’s important to understand why cleaning them is necessary. Your outdoor unit needs space to release heat and draw in air, but plants, twigs, leaves and other debris can restrict that airflow. When this happens, your AC has to work even harder to reach your preferred temperature.
Start by removing loose debris from around the base of the unit. If needed, trim nearby shrubs and plants to prevent them from shedding leaves and needles near your condenser. Don’t forget to check above the outdoor unit. Low branches can block air flowing from the top or drop debris into the system.
Next, use a soft brush or cloth to clean inside the unit. Use caution when removing the top grille, as using too much force can damage the fan wires. The grille is somewhat heavy, so have a friend or family member hold it while you clean.
If there are leaves on the bottom of the cabinet, remove them with your hands or a wet/dry vacuum. Be extra careful around wires and loose components.
3. Inspect the Condenser Coil and Fins
The condenser coil runs around the outside of the unit. Thin metal fins cover the coil, transferring heat from your home into the outdoor air. As you inspect the coil and fins, look for grass, dirt and other materials.
You should also watch for:
- Bent or crushed fins
- Loose wires
- Damaged insulation
- Corrosion/rust
- Oily residue
- Damaged or cracked refrigerant lines
If the fins are just slightly cracked, you may be able to straighten them with a fin comb. Use caution, as the metal is thin and easy to damage. If the fins are crushed, call Anton’s for assistance. Don’t touch the refrigerant lines or try to adjust any electrical connections.
4. Apply AC Condenser Coil Cleaner
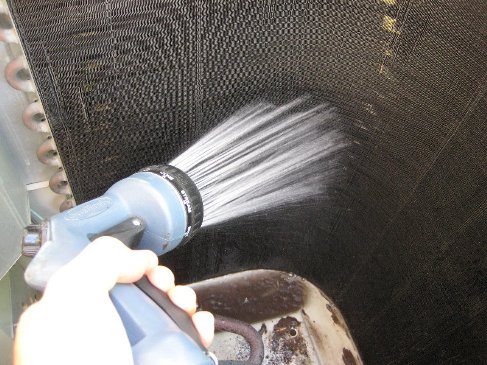
Use a garden hose to rinse loose dirt from the coils. Spray from the inside of the cabinet outward to avoid pushing debris deeper into the unit. It’s also important to use a gentle stream of water instead of a powerful spray. Never use a pressure washer, or you may damage the fins.
If you still have buildup, apply an AC condenser coil cleaner made for outdoor units. Read the label and follow the manufacturer’s instructions. Some formulas require immediate rinsing, while others need to be diluted before you can use them safely.
Follow these tips to clean your coils without causing damage:
- Avoid spraying the electrical controls
- Apply the cleaner evenly
- Let the cleaner sit for as long as the manufacturer recommends
- Use a soft brush if approved by the manufacturer
- Rinse thoroughly if required
5. Reassemble and Test Your AC
Now it’s time to replace the top grille, fan assembly and other components. Confirm there are no pinched wires or loose screws before you check this task off your to-do list. To restart your air conditioning system, restore power, wait a few minutes and set the thermostat to COOL. Make sure the temperature on your thermostat is lower than the current room temperature, or the system won’t kick on.
Within a few minutes, the outdoor fan should start running. Listen for rattling, grinding and other unusual sounds. You should also make sure you have cool air coming in your vents and warm air blowing upward from the condenser. Call us if your unit trips the breaker, makes unusual noises or doesn’t cool your home.
How Often Should You Clean an Outside AC Unit?
In most cases, it’s fine to clean your outside unit once per year, ideally before the cooling season begins. You may need to clean it more often if it’s near trees or shrubs or your home sits near a dusty road. During the summer, inspect the unit every few weeks to make sure there isn’t any debris blocking airflow. Replace the filter as needed to ensure your system operates as efficiently as possible.
Keep Your Outdoor AC Unit Clean
Knowing how to clean an outdoor AC unit can help you keep your home cool all summer. With the right AC condenser coil cleaner, it’s easy to improve energy efficiency, lower your energy bills and extend the life of your HVAC system. If you still experience cooling issues despite your best efforts, Anton’s can help.


